There are 2 schools of thought regarding the preparation and application of henna and herbal dye batter and I will share with you in this complete guide the method that I have been using with great satisfaction for many years now. Obviously I chose the simplest and most practical school of thought and as far as I'm concerned, also the most effective!
What I will share with you below is not to be followed to the letter, rather, please do your own experiments and draw your own conclusions. Then, if you like, we can discuss the results obtained in the comments area at the end of this article.
My intent is to bring you back in this guide what I have learned in the last 10 years of monthly applications of henna and herbal dyes and therefore to give you the opportunity to approach this complex and fascinating world also from a different point of view from the one you can usually read online in almost any forum or on social media.
Remember to subscribe to the youtube channel for new tutorials on dyeing herbs -->> SUBSCRIBE
I have given indications on the preparation and application of henna and herbal dyes both in the video tutorial that you find listed above and in the blog post : " Early white hair? Cover it naturally with henna and herbal dyes ", but the present article should be able to dispel any doubts you may still have about the preparation and application of henna and herbal dyes.
Henna preparation
As you may well know, there are 2 types of henna on the market:
or- henna with sodium picramate added , a synthetic substance that enhances red and enhances red tones.
Sodium picramate is thought to be toxic to the fetus, so it's not very healthy for us either.
But if you decide to use henna with picramato added anyway because you want to get a more intense and stronger color, remember that it could chemically interact with the dye made previously, resulting in strange colors and reflections that can turn green.
In this video you can find out how long after chemical dyeing you can do henna and vice versa .
*********************
Don't know how to do the test test before proceeding on the whole hair? Not sure how to calculate the percentages to use in your mix of herbal dyes ?
The answers can be found in the tutorial above.
Alternatively you can always download the excel file which will help you calculate the percentages in grams accurately .
So:
- Always test by applying henna to a hidden strand of hair to see what color you get. I recommend the test test whether you decide to use strengthened or pure henna. If you have never used herbal dyes, the test is a must to avoid a too dark / intense / red color throughout the hair.
- Remember to always check the Inci of natural colors before applying to avoid unpleasant surprises. If you have chosen to use pure henna, the label should only state the Latin name of the plant, i.e. Lawsonia Inermis or if you have chosen to use a mix of herbal dyes, it should state the Latin name of each individual herbal dye in the mix .
Necessary tools

Make sure you have on hand:
- 1 glass or ceramic bowl (no plastic because it absorbs the colour)
- 1 wooden, plastic or ceramic spoon
- 1 pair of disposable gloves (to be worn as soon as you start handling the herbal dyes)
- 1 hair color brush (available in any supermarket)
- 1 wooden comb with wide teeth (to prevent damp hair from breaking when combing it)
- 1 pack transparent film or a disposable shower cap to cover the head and maintain a high humidity
- 1 wool hat (it is the heat and humidity that facilitate the release of the color)
Clean or dirty hair?
Before proceeding with the preparation of the henna batter , make sure your hair is clean (it does not matter if it has just been washed and is still slightly damp or if it has been washed for 12 - 24 hours).
Don't think that she has never tried to be smart and has never applied the henna pack on dirty hair. :) Unfortunately, sebum, dust, smog create an insulating and waterproof patina on the hair and prevent excellent color rendering. I was able to see it firsthand after 4 hours of application and it is certainly not pleasant to discover that I wasted 4 hours .
In addition, by applying the henna pack on already clean hair you no longer have to use shampoo* in rinsing, therefore you also minimize the risk that the color not yet fixed on the hair will be washed away.
*The shampoo should instead be used if by chance you feel itchy during the exposure time or after having rinsed off the dyeing herbs.
READ ALSO: Allergy to Henna? Itchy head and scalp? Here's what to do!
Do I have to do the double step or is a single application enough to color my hair?
Henna batter preparation
Some people prepare the lawsonia batter 12 - 24 hours before application, acidifying it (by adding an acidic ingredient such as vinegar or lemon juice) , but I insist you do NOT need it because personally on my hair there is NO difference in color release. If you really love to complicate your life, go ahead! :)
Lawsonia creates by itself together with water the acidic environment necessary for the release of the colour.
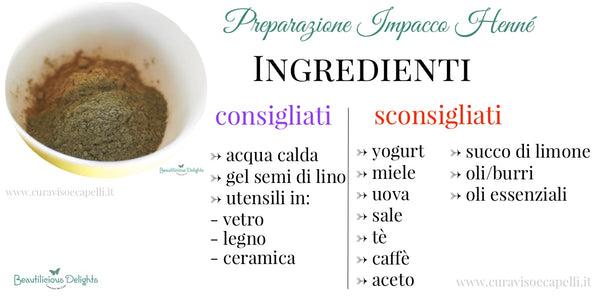
Click on the image to enlarge.
If you think it could be useful for your friends too, feel free to share it
Add only hot (not boiling!) tap water to the amount of henna necessary for your hair until you obtain a batter with a consistency similar to yogurt, neither too runny nor too thick, to facilitate application and prevent coli during installation.
For various reasons, it is customary to add the most varied ingredients to the henna batter :
- lemon, tea, yogurt or vinegar to acidify (but which due to the long exposure time could dry the hair even more)
- coffee or cocoa to bring out the dark tones of the dye obtained (nothing could be more false because they do not contain any coloring agent)
- honey and various vegetable oils or butters to soften and counteract the dry / frizzy effect of the herbal dyes after application (better to make a moisturizing / nourishing pack once we have dyed our hair)
- essential oils to cover the scent of dyeing herbs (which I do not recommend because they irritate the skin). Use the tips I've given in this article: Acid Rinse: Apple or Lemon Vinegar for Shiny and Soft Hair! to remove the smell of henna from your hair.
Avoid adding anything other than hot water!
Any other ingredients you add, just interfere and film (in case of oils, butters) and prevent the release of color on your hair.
READ ALSO: Why does henna NOT cover white hair? Here's what you're doing wrong !
Improving the consistency of the batter of henna and herbal dyes
Remember to subscribe to the youtube channel for new tutorials on dyeing herbs -->> SUBSCRIBE
If the batter you're applying is flying in chunks all over the bathroom, it's very likely that your mix contains sand. Unfortunately, there are cases of dishonest retailers who add sand to gain weight on the scale.
How do you know if your herbal dyes are pure?
You can only tell when preparing and applying henna, based on what the batter looks like. The 100% pure dyeing herbs result in a creamy mix , easy to spread on the hair, which does not drip and absolutely does not fall apart, dirtying you, your clothes and the environment around you.
To improve the consistency of the henna batter I boil flax seeds in tap water (1 tablespoon in 300g of water), filtering the water when it has a not too thick gel consistency. Otherwise, if you wait too long, the gel becomes too thick and then mixed with henna it is difficult to apply on the hair. You can watch the tutorial below:
Remember that any other "solid" ingredients you add to improve the consistency of the henna batter will dilute the final color you want to achieve. I don't recommend it especially if you want to cover white hair .
Henna application
Once the water has been added to the henna or to the mix of dyeing herbs, mix well until a creamy consistency is obtained and proceed immediately with the application on clean hair.
In the video tutorial linked at the beginning of this blog post you can see the method I use in the application.
Remember to use latex gloves as soon as you start handling the herbs. In particular, the lawsonia inermis colors the palms of the hands and the fingers yellow / orange. Luckily it does NOT color the ears or other parts of the face (forehead/temples, etc). To avoid any hiccups during application, remember to always use old house clothes because the herbal dyes stain and hardly come off.
Exposure times
Remember to subscribe to the youtube channel for new tutorials on herbal dyes -->> SIGN ME UP
Make sure you cover your entire head well with plastic wrap or a shower cap to always maintain a good level of humidity. Put a woolen hair on top (even in summer! :)) to keep the temperature high and facilitate the release of the colour.
If you have a hot helmet available (like the ones available at the hair salon) using it can speed up the color release process by cutting the processing time required in half. Considering that each hair is unique, you just have to experiment firsthand to understand if using a hot helmet you can get excellent color rendering even in just 2 hours.
As for posing times, I talk about it in depth here: " Henna Preparation and Dyeing Herbs: Pose Times and Application Frequency " and if you want, you can also find out how to halve the henna posing time .
The optimal exposure time would be between 4 and 6 hours, but it is very subjective and I sincerely advise against such a long exposure time which can lead to cases of scalp sensitization. Depend on:
- how intense we want the color to be,
- the porosity of the hair and its power to absorb colour,
- how delicate or not our skin is.
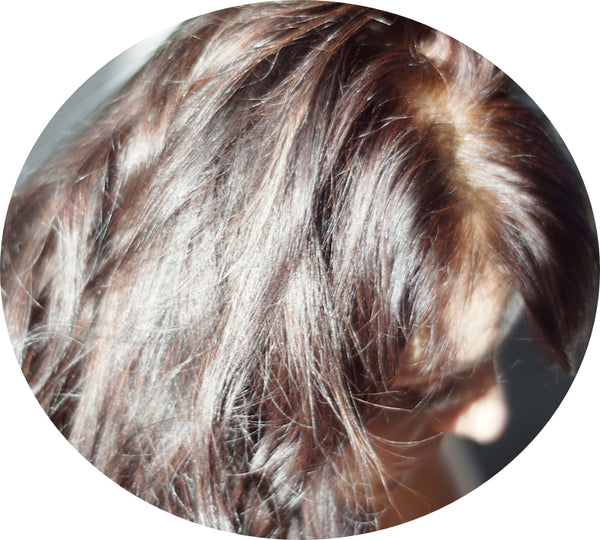
Although I have 75% white regrowth, I can get good coverage with a shutter speed of only 4 hours or 2h and a half if I use the tricks to halve the shutter speed.
READ ALSO: Does henna discharge at the sea or in the pool? My tips!
Rinse and wash
The ideal would be not to use any shampoo , also because by applying henna and dyeing herbs on clean hair there is no real need.
By massaging and rinsing the scalp well and for a long time (even for 5 minutes using cold water) to remove the herbal dyes, I manage to avoid shampoo but I always use a small amount of conditioner on the lengths to make it easier to comb and untangle them.
If you know you have a delicate and sensitive scalp, I suggest you reduce the exposure time to a minimum of 3-4 hours ( henna and dyeing herbs are natural, but after a long exposure time they are not so delicate on the scalp) and to use a delicate shampoo (perhaps diluting it in a separate container) to remove any small piece of dyeing herb which could otherwise cause redness and itching in the days following application.
READ ALSO: Shiny and Soft Hair With Acid Rinse: Apple or Lemon Vinegar?
The last rinse I do with cold water and vinegar (1 tablespoon of vinegar diluted in 1 liter of water) to fix the color and close the scales of the hair. To prevent it from becoming too aggressive on the scalp or hair, I only use this trick when doing henna wraps.
On all other days, after washing my hair, I use the Beautilicious Delights Volumizing Shiny Hair Spray or the Restructuring Spray for Frizzy Hair (depending on the season, my hair also has its preferences) which, thanks to fruit acids and of aloe they carry out the same polishing action as vinegar , but without the risk of it being too aggressive and at the same time they add volume to my hair or remove the frizz that always shows up on particularly humid days.
Remember that the final color of the application will only be seen 3 - 4 days after application, when the colors finish oxidizing and fixing to the hair.
If you fear that using the shampoo will cause the color of the dyeing herbs to unload too much, I suggest you wash your hair with Sidr, natural hair shampoo as an alternative.
Very delicate alternative method and excellent for maintaining an intense color.

Considering the high percentage of white hair I find, I'd say the results are remarkable, what do you say? :)
************************************************** *************************************************
This is my guide to the preparation and application of henna and herbal dyes that I have been using with great satisfaction and excellent results, even in covering gray hair for more than 10 years.
READ ALSO: Remove the Red Henna from the Hair! Indigo, Amla, Walnut Hull or Katam?
It doesn't mean that the other methods of application are wrong or that they always give less satisfactory results, but between complicating my life with hours and hours of oxidation / acidification - resulting in a dry and frizzy effect on the hair - and choosing the simplest and most practical method with optimal results, I obviously chose the second option.
To obtain satisfactory results in terms of color rendering, I advise you to use exclusively eco-bio hair products and to start excluding hair products containing silicones from your daily hair care.
I recommend reading the article dedicated to detoxifying hair from silicones and/or viewing the tutorial published on the "Aware Beauty" Youtube channel linked below if you want to understand how much silicones can affect the color rendering of henna and herbs dry cleaners .
What method of preparation and application of henna and dyeing herbs do you use? Do you have any suggestions that made a difference for you?
© Beautiful Delights
In the online shop you will find everything you need (including herbal dyes) to take care of your skin and hair in a conscious way. Click HERE to visit it!
************************************************** *************************************************
Keep in touch with us:
FOLLOW US
- on our Facebook page by clicking on the icon below:

- on the Conscious Beauty Youtube channel -->> SUBSCRIBE
or
SUBSCRIBE
to our Newsletter to receive exclusive offers reserved for our subscribers and all the latest news: